


What Is a Project Management Timeline and 7 Steps to Make It for Free
Last update: 27 March 2025 at 03:47 pm
 5.00/5
If you have had to lead projects that involve a work team, you can understand how complicated it is to keep track of pending tasks, the people in charge, delivery dates, and progress in general.
Especially if you do not have a system designed for this particular purpose.
In this article, we want to teach you everything related to the project management timeline.
It is an essential tool for organizing work; visually, it allows you to understand what stage you are in, what tasks are still pending, and what each person is working on.
What is a Project Management Timeline?
When we talk about a project management timeline, we refer to a board where the project’s total duration is established.
It organizes the tasks with their start and end dates and specifies who is responsible for each activity and what resources will be needed.
Thanks to technology, these boards are now digital. They are allowing real-time collaboration of all the people involved.
They will be able to mark tasks as lists, notify changes or delays that may arise over time, or request the participation of other team members at a specific point.
You update all this information and visually motivate your team to reach the final goal within the established timeframe. Understanding how to create and manage these timelines is often part of a structured Project Management Course, where such essential skills are taught in detail.
How to Make a Project Management Timeline?
To make a timeline of activities that fits the real needs of the project you will execute, it is necessary to follow the next steps.
It is important to note that this applies to any project, regardless of the industry you belong to or the objective to be achieved:
1 – Define the objectives:
First, you must define what you want to achieve with this project. What is the final result, and then start to determine the significant milestones to be achieved along the way?
2 – Identify who should be involved:
Write a list of all the people working on the project, including those with occasional participation. We suggest that each name be accompanied by a short description of their strengths and areas of expertise.
3 – Specify the final closing date:
You must define the closing date of the project. This information will serve not only to establish the delivery days of each action to be performed but also as motivation for the entire team. From Sortlist, we recommend you set this date, leaving a margin of error. That is, taking into account that there may be delays along the way.
4- Make a list of all the tasks to be completed:
Take some time to write down all the tasks that must occur to achieve the project’s final goal, try to include even the simplest ones, and consult with all the people involved to avoid forgetting to put any of them.
Modern project managers streamline their task organization using an all in one digital planner to track deadlines, responsibilities, and project milestones in a single unified platform.
5 – Assign those responsible:
Now is the time to define which team members will be involved in each task. We recommend that you include them in this process. You don’t want to assign people who don’t have the time or skills to take on these assignments.
6 – Establish delivery dates for each task:
Starting from the final closing date of the project, begin defining the days on which each of the tasks you determined above must be created and delivered. Consider the necessary execution time and leave a margin for unforeseen events.
7 – Assemble the schedule in the tool you have selected:
Now that you know what needs to be done, who is responsible, and the dates, it is essential to assemble this schedule in the project management tool you have selected, such as ClickUp software. We explain how you can do it both in Excel and Word.
Steps to Make a Timeline in Excel
Different online tools allow you to create your project’s schedule. However, at Sortlist, we understand that there are situations in which you don’t have access to these types of systems.
That’s why we want to teach you how to do it in Excel. What we are going to explain below is how to create a Gantt chart.
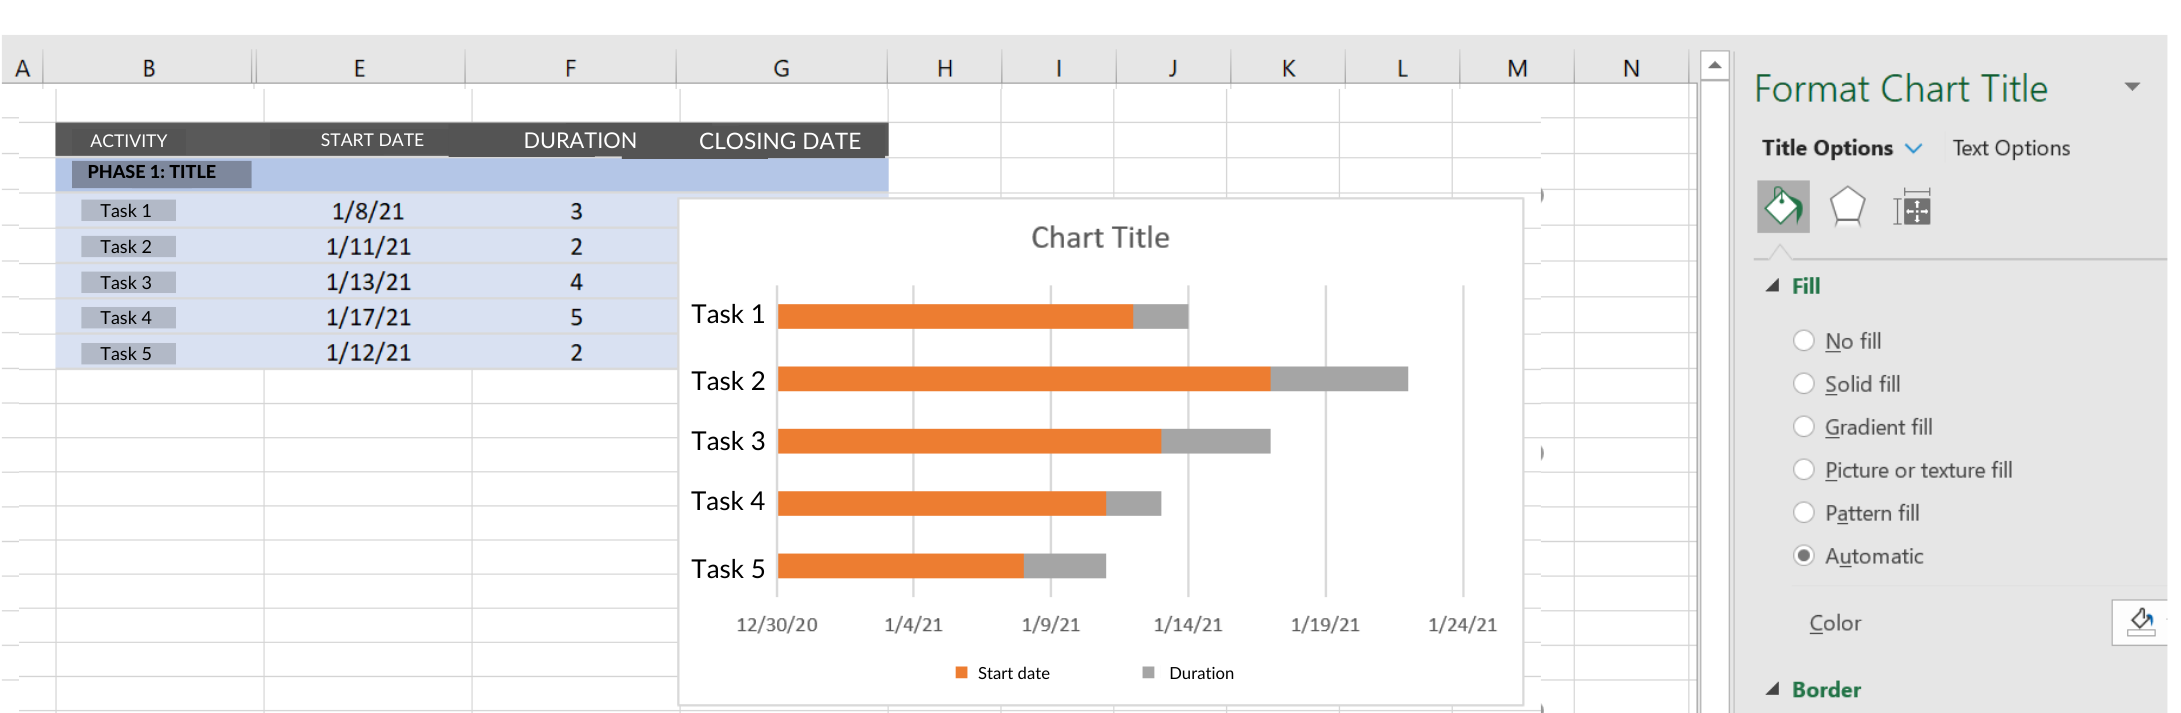
Step 1 – Create the Activity Table
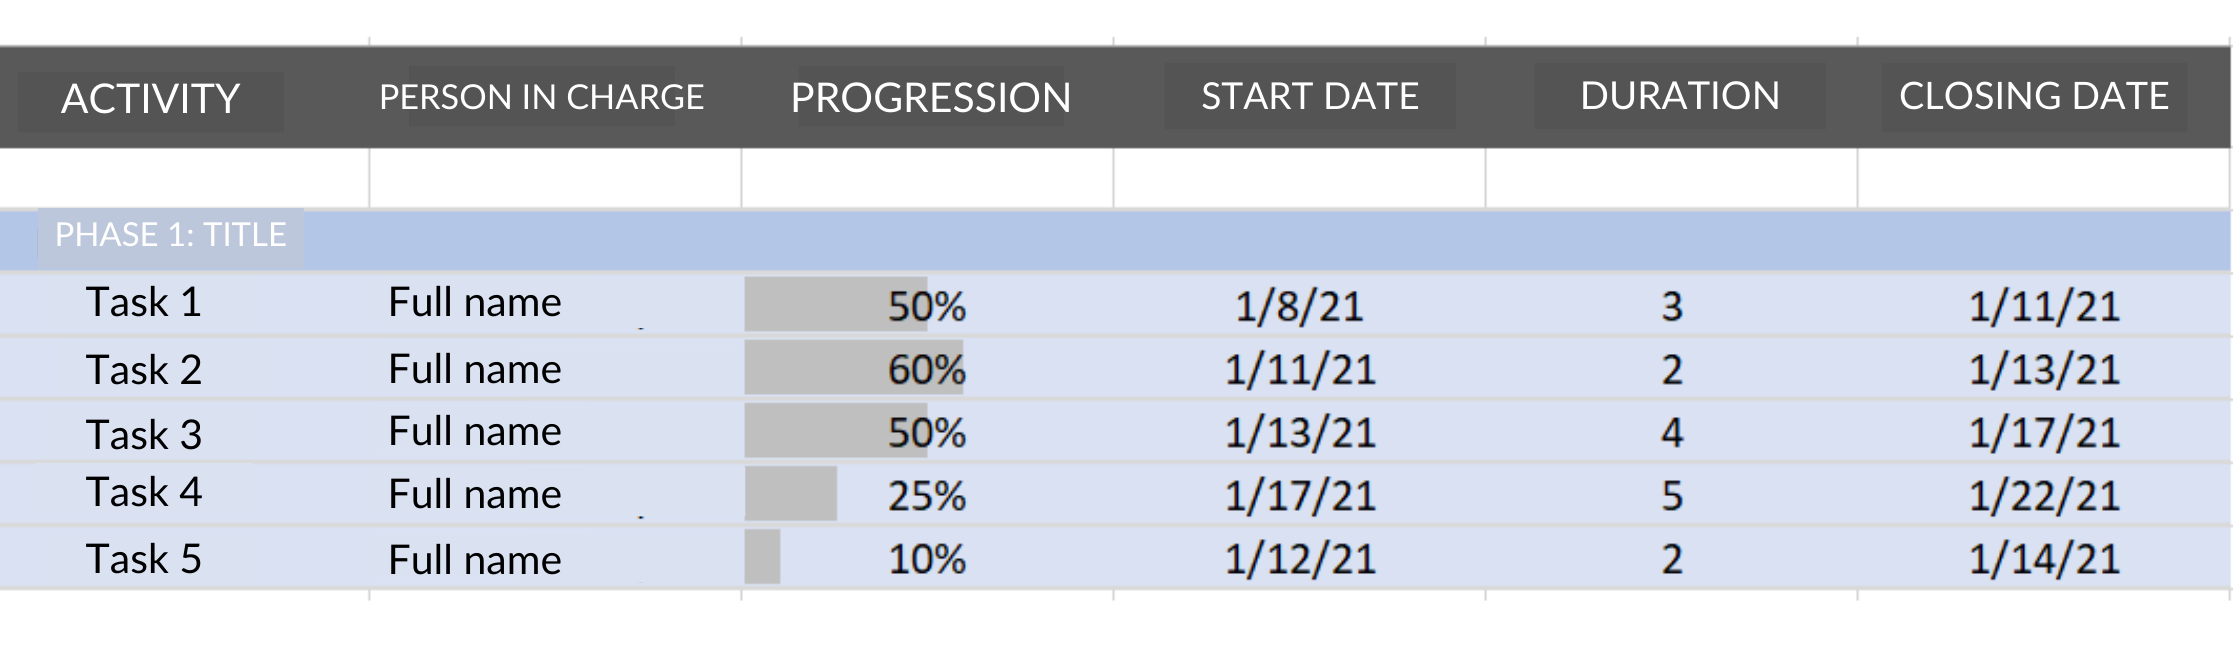
In an Excel sheet, you must create a table with the following columns:
- Activities
- Responsible
- Progress
- Start date
- End date
- Duration
Under each of them, you must fill in the corresponding information, except in the case of the column titled “duration.”
You can use a formula that automatically calculates the time (hours, days, weeks, months) each task will take. The procedure is to subtract the end date from the start date. For example, if you put the start date in cell A2 and the end date in cell B2, the duration equals B2-A2.
Step 2 – Create the Gantt Chart
Select the columns corresponding to the activity, start date, and duration. You can hide the other columns; do not delete them.
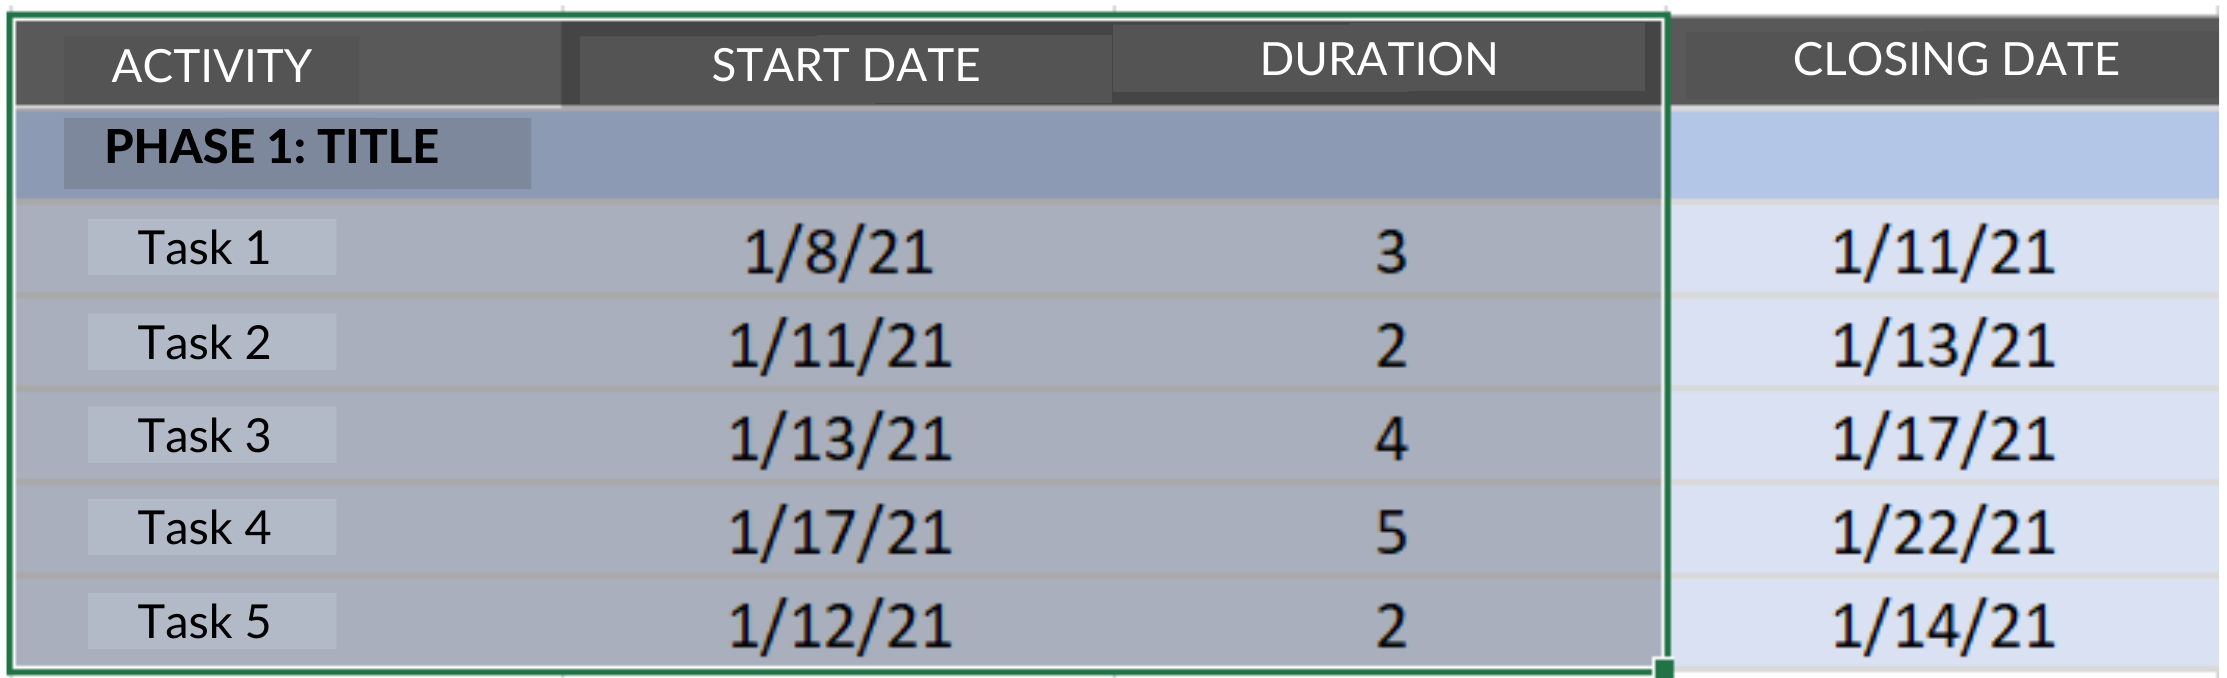
Go to the top menu and find the insert option. Click on the bar chart icon and select the stacked bars option.
You will see a stacked column chart with all your project tasks there. In the following steps, we will be working on improving some details.
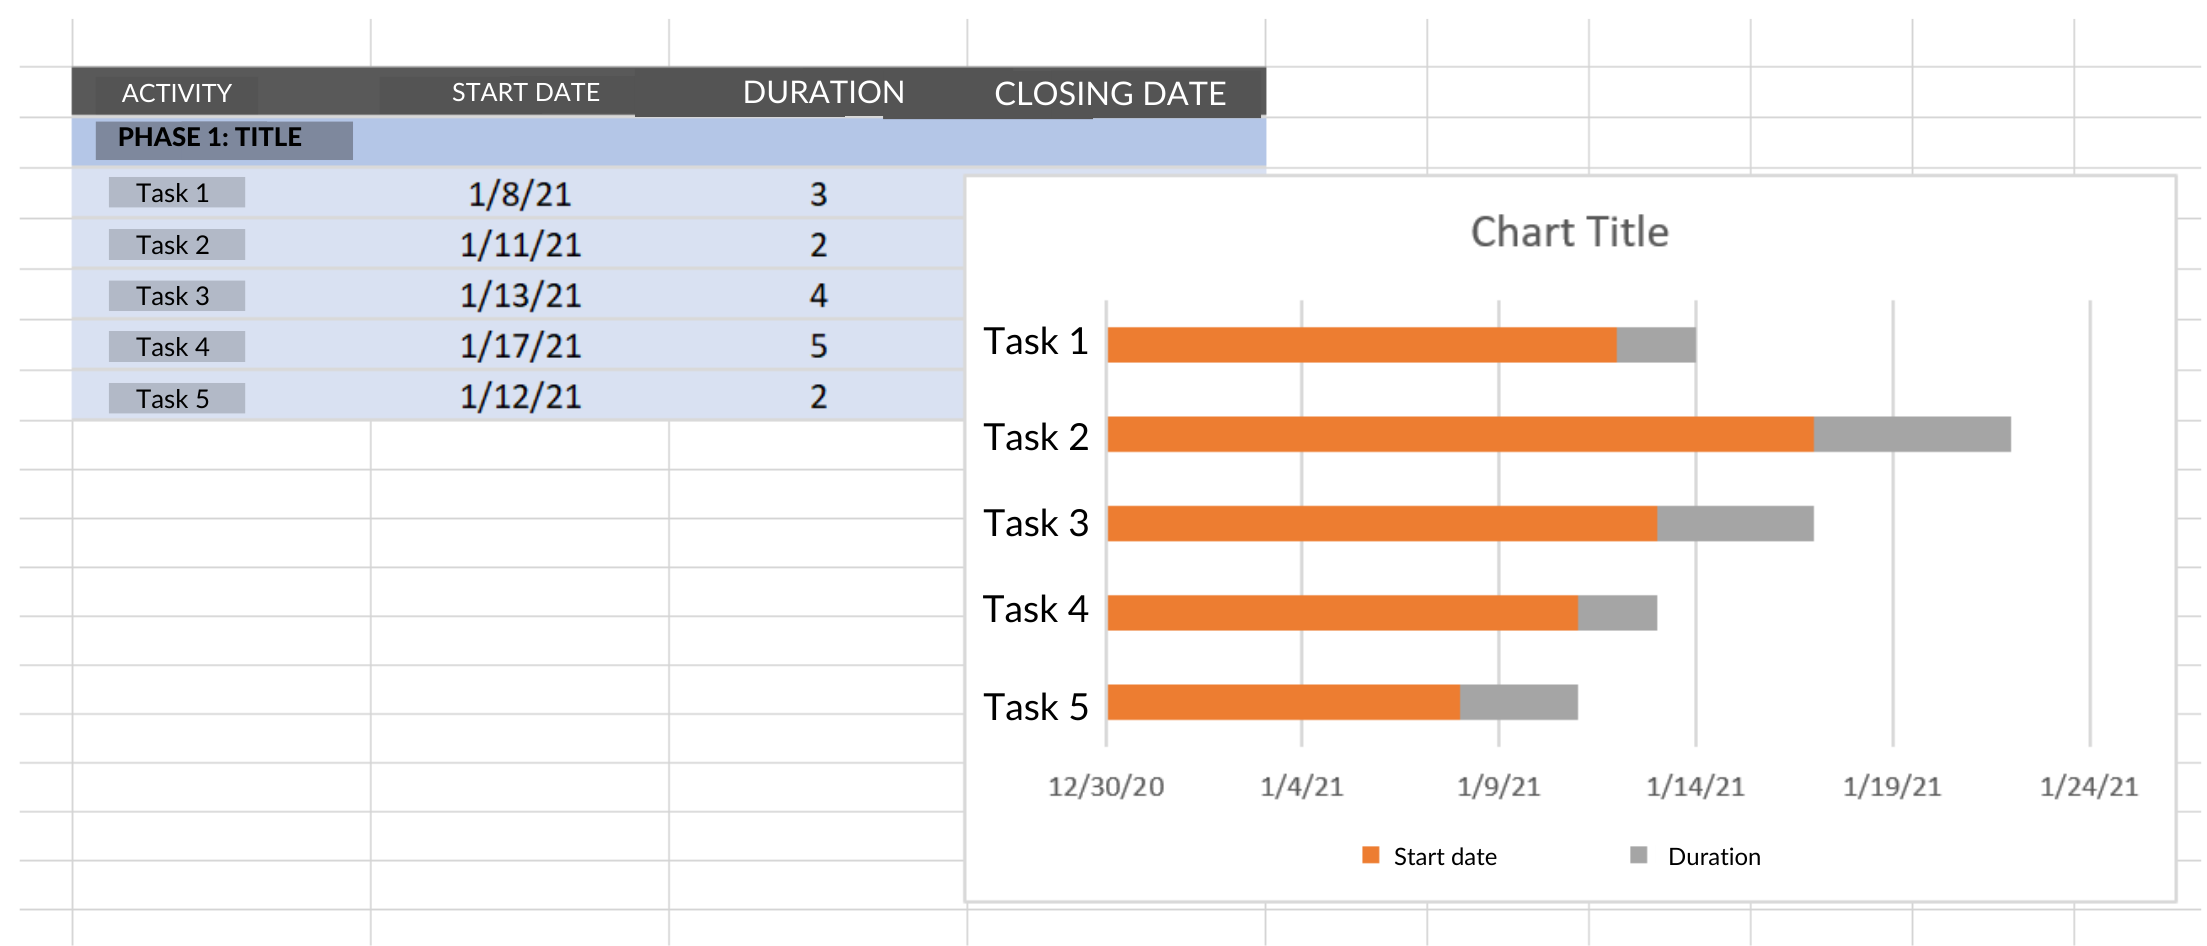
Step 3 – Customize the Diagram
Double-click on the title and place one that fits the project. Also, you can adjust the size, decorative lines, and more in the right column.
Now, select the chart elements option and ensure the legend is unchecked.
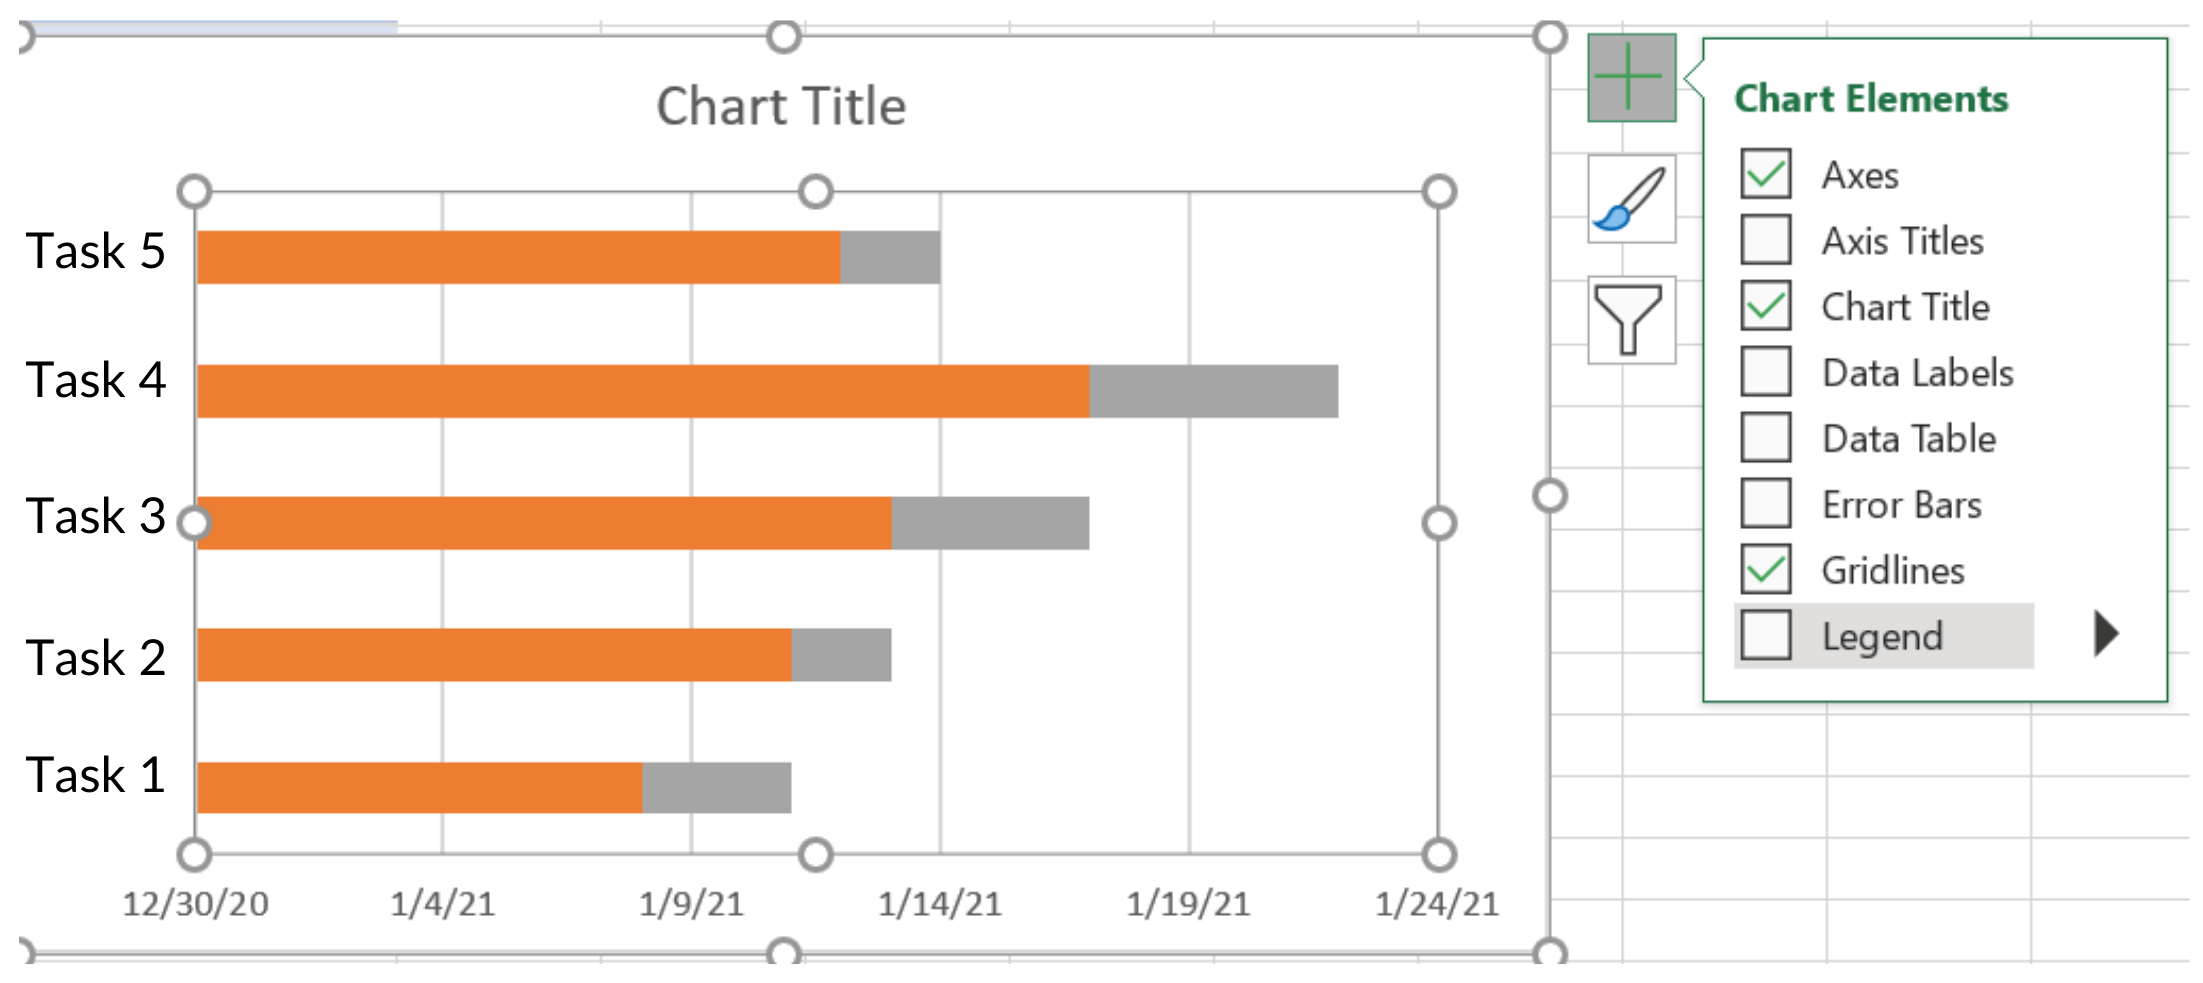
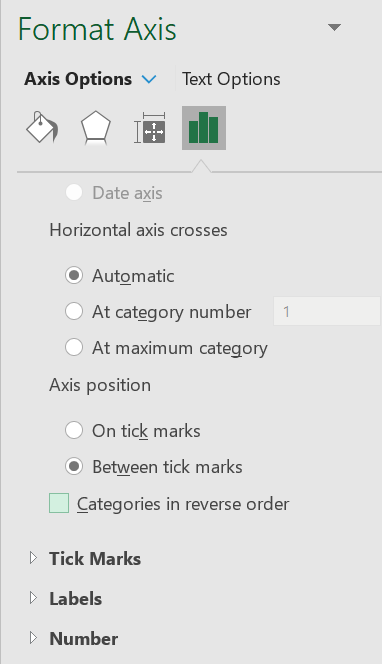
In the images we have shared, you can see that the tasks appear from the last to the first. To adjust it to the correct order, click on the list of activities in the right menu, select Axis Options, and check where it says Categories in reverse order.
All the activities will appear in the corresponding order.
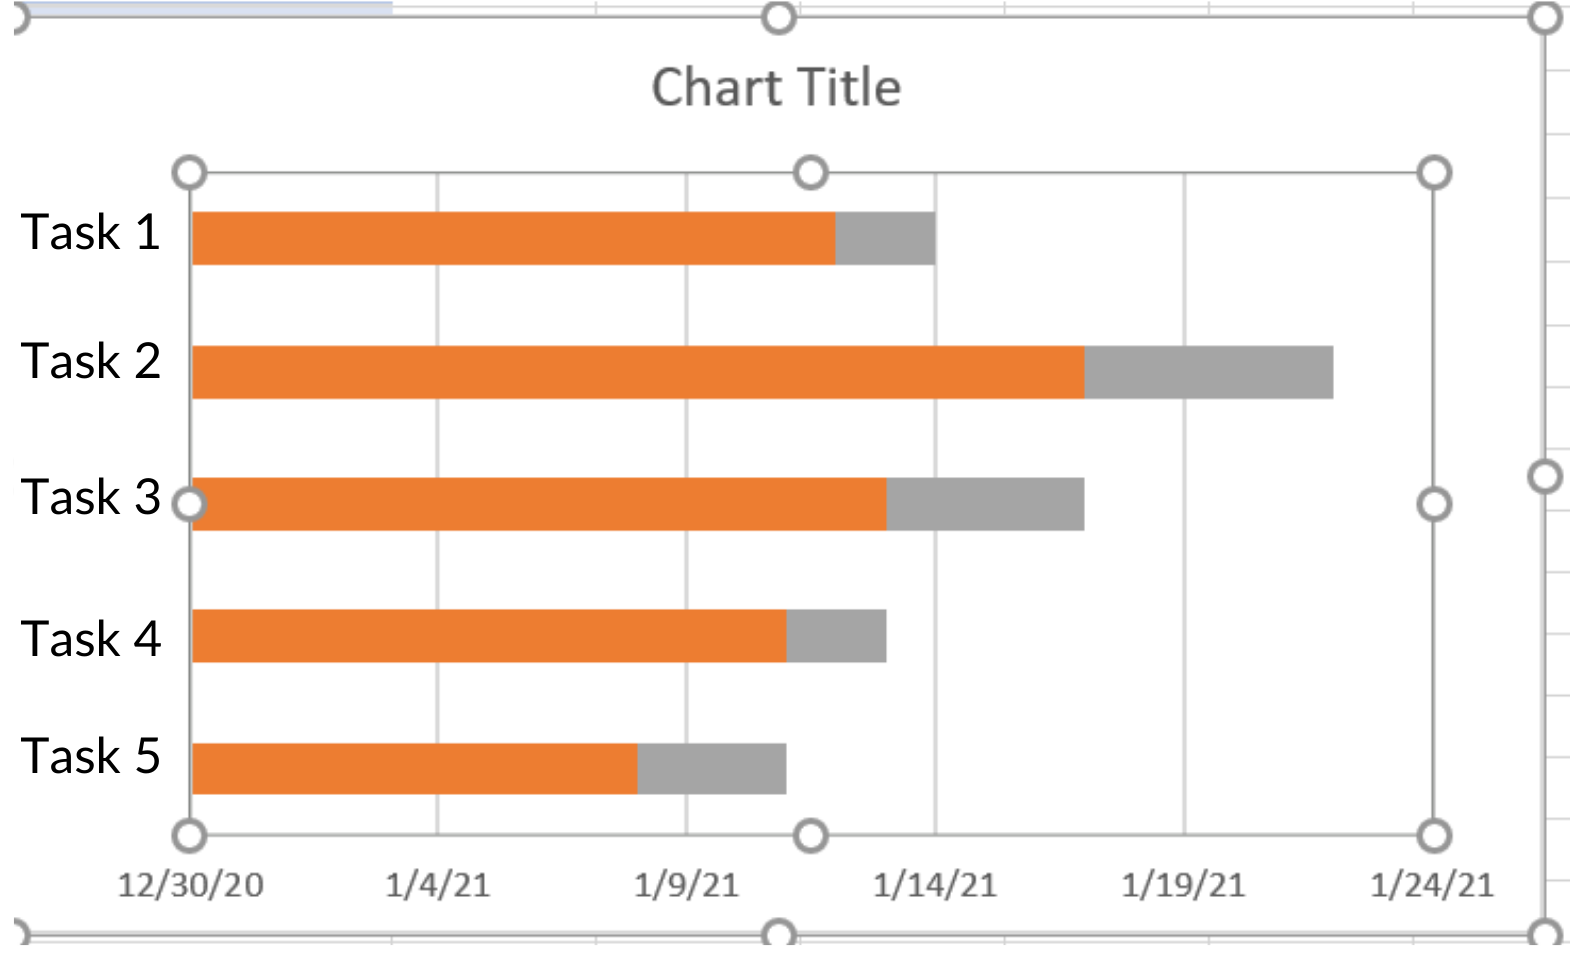
Select the bars that correspond to the start date. In the case of the example we have been sharing, these are the orange ones.
In the menu on the right, check the “no fill” option. And you will see that now only the bar corresponding to the progress of each task appears.
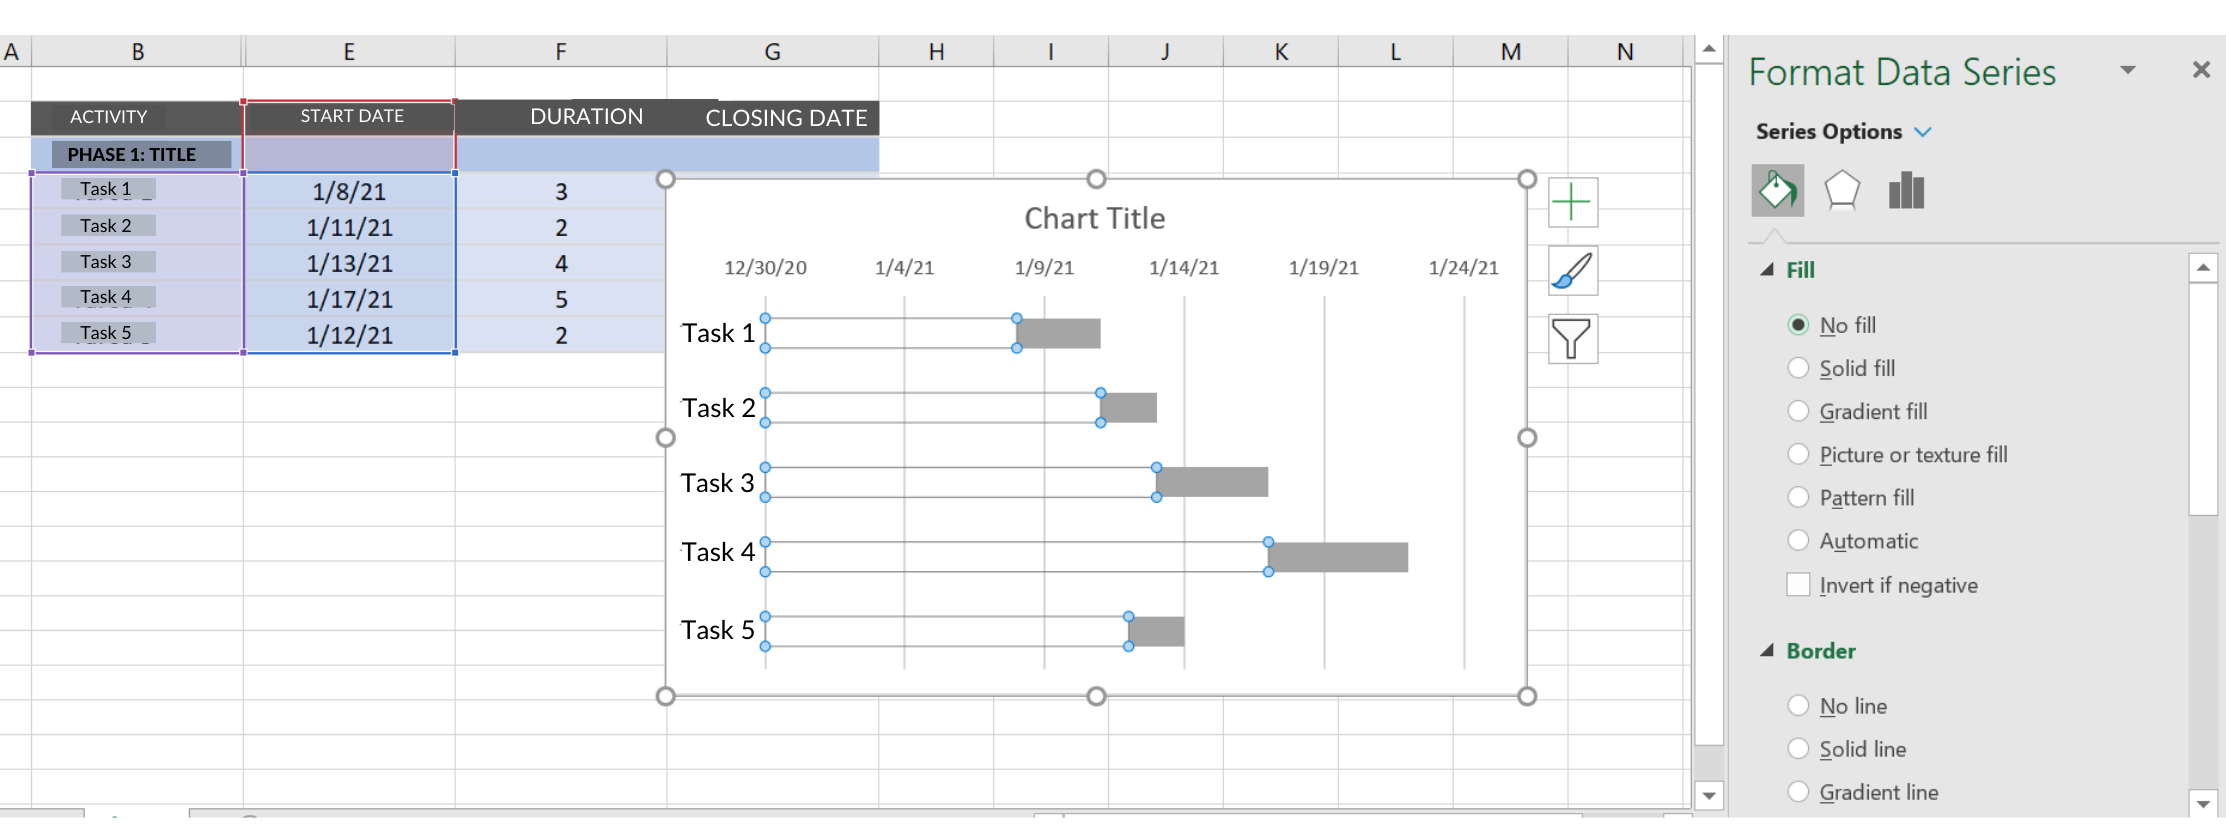
Finally, all that remains is eliminating the blank spaces left by deleting the bars corresponding to the start dates.
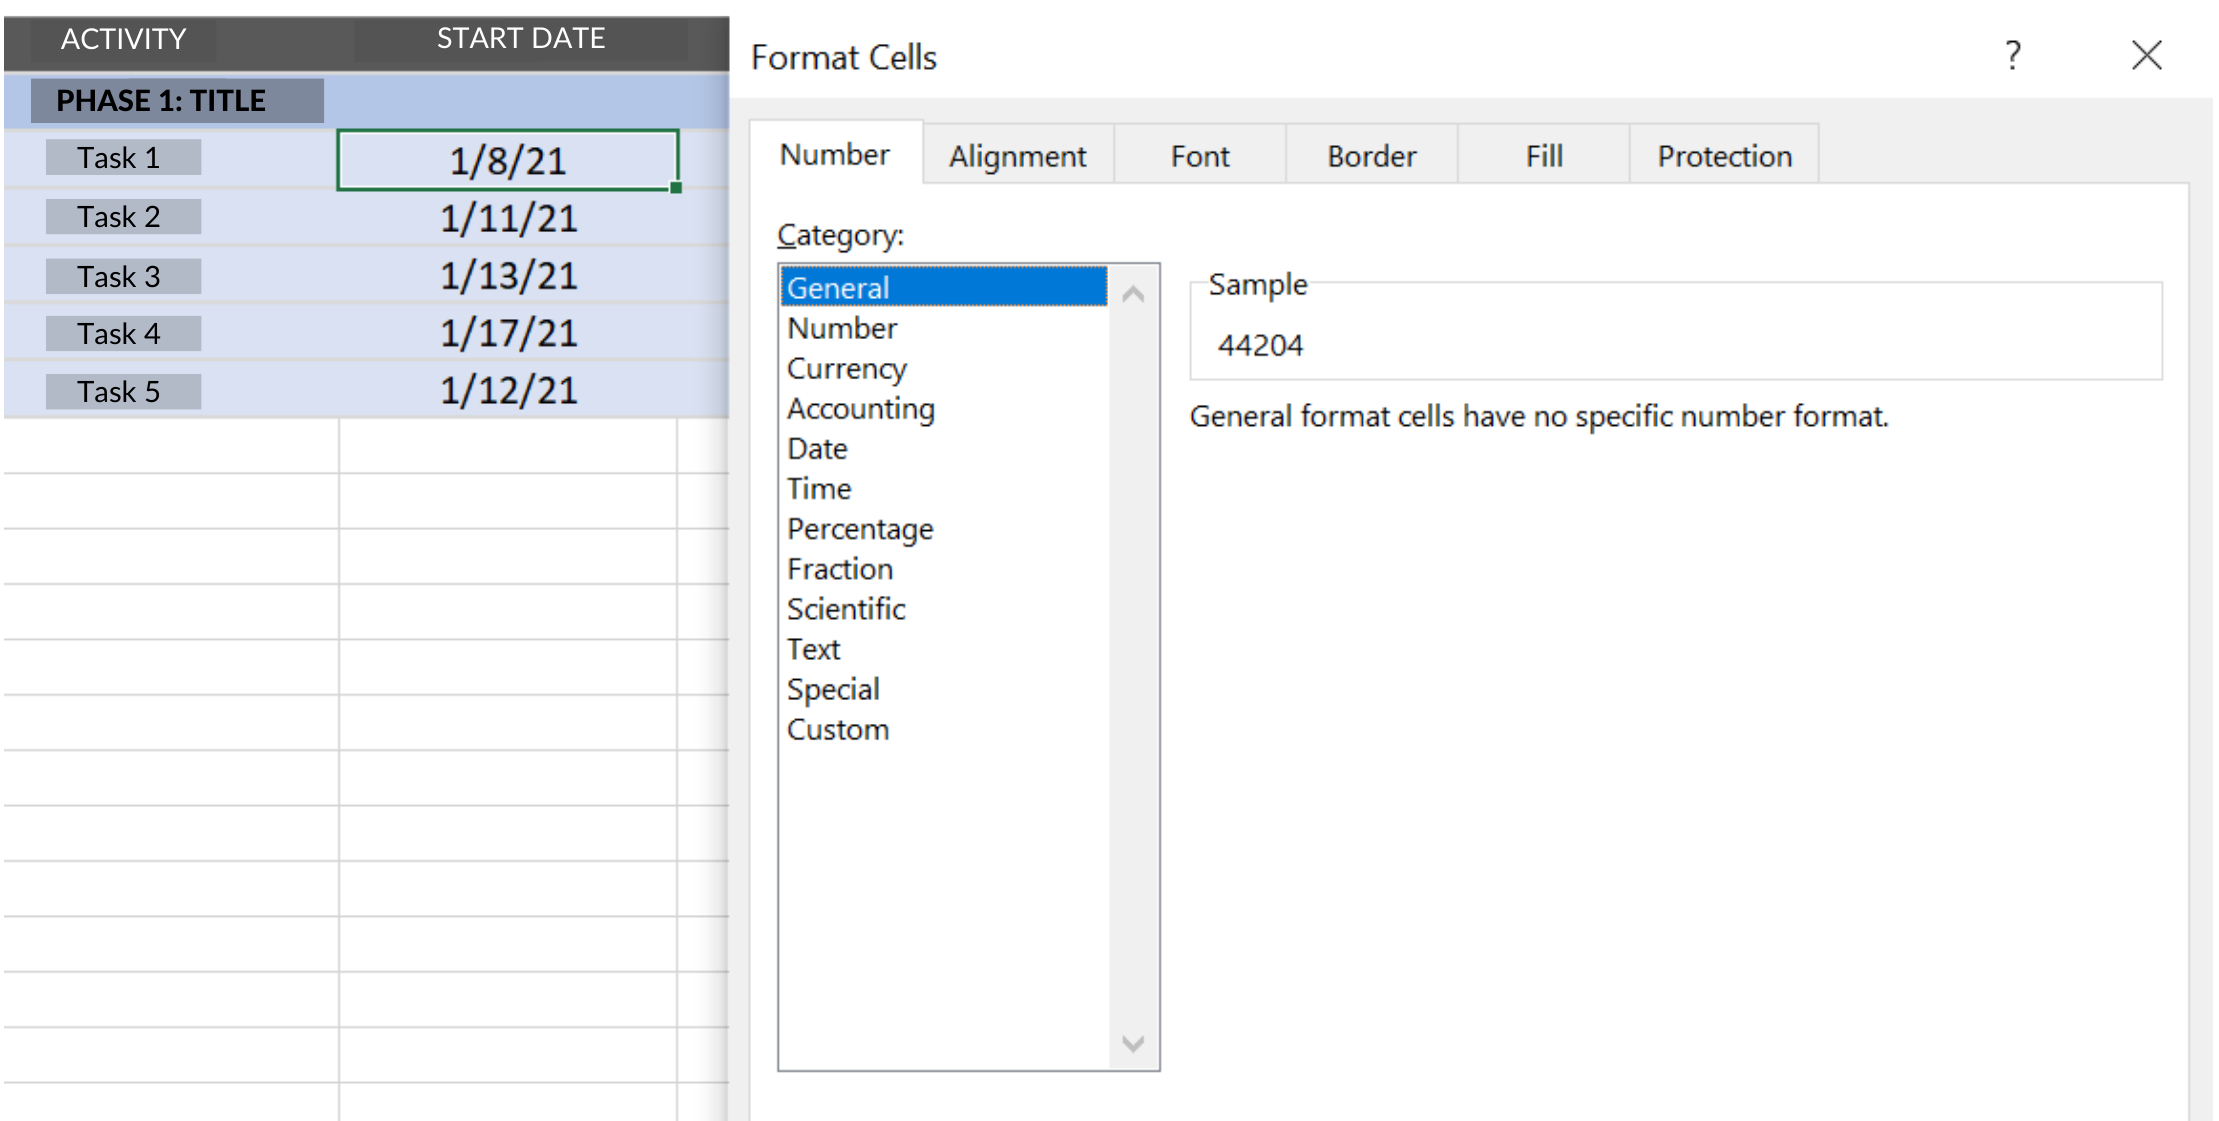
To do this, go back to the table of activities, right-click on the first date you have, select the cell format option, and then click on general. Write down that number. In our case, it corresponds to 44204.
Go to the diagram you create, right-click the date bar, and select axis format.
In the menu on the right, go to where it says lower limit and type the number you just copied (44204).
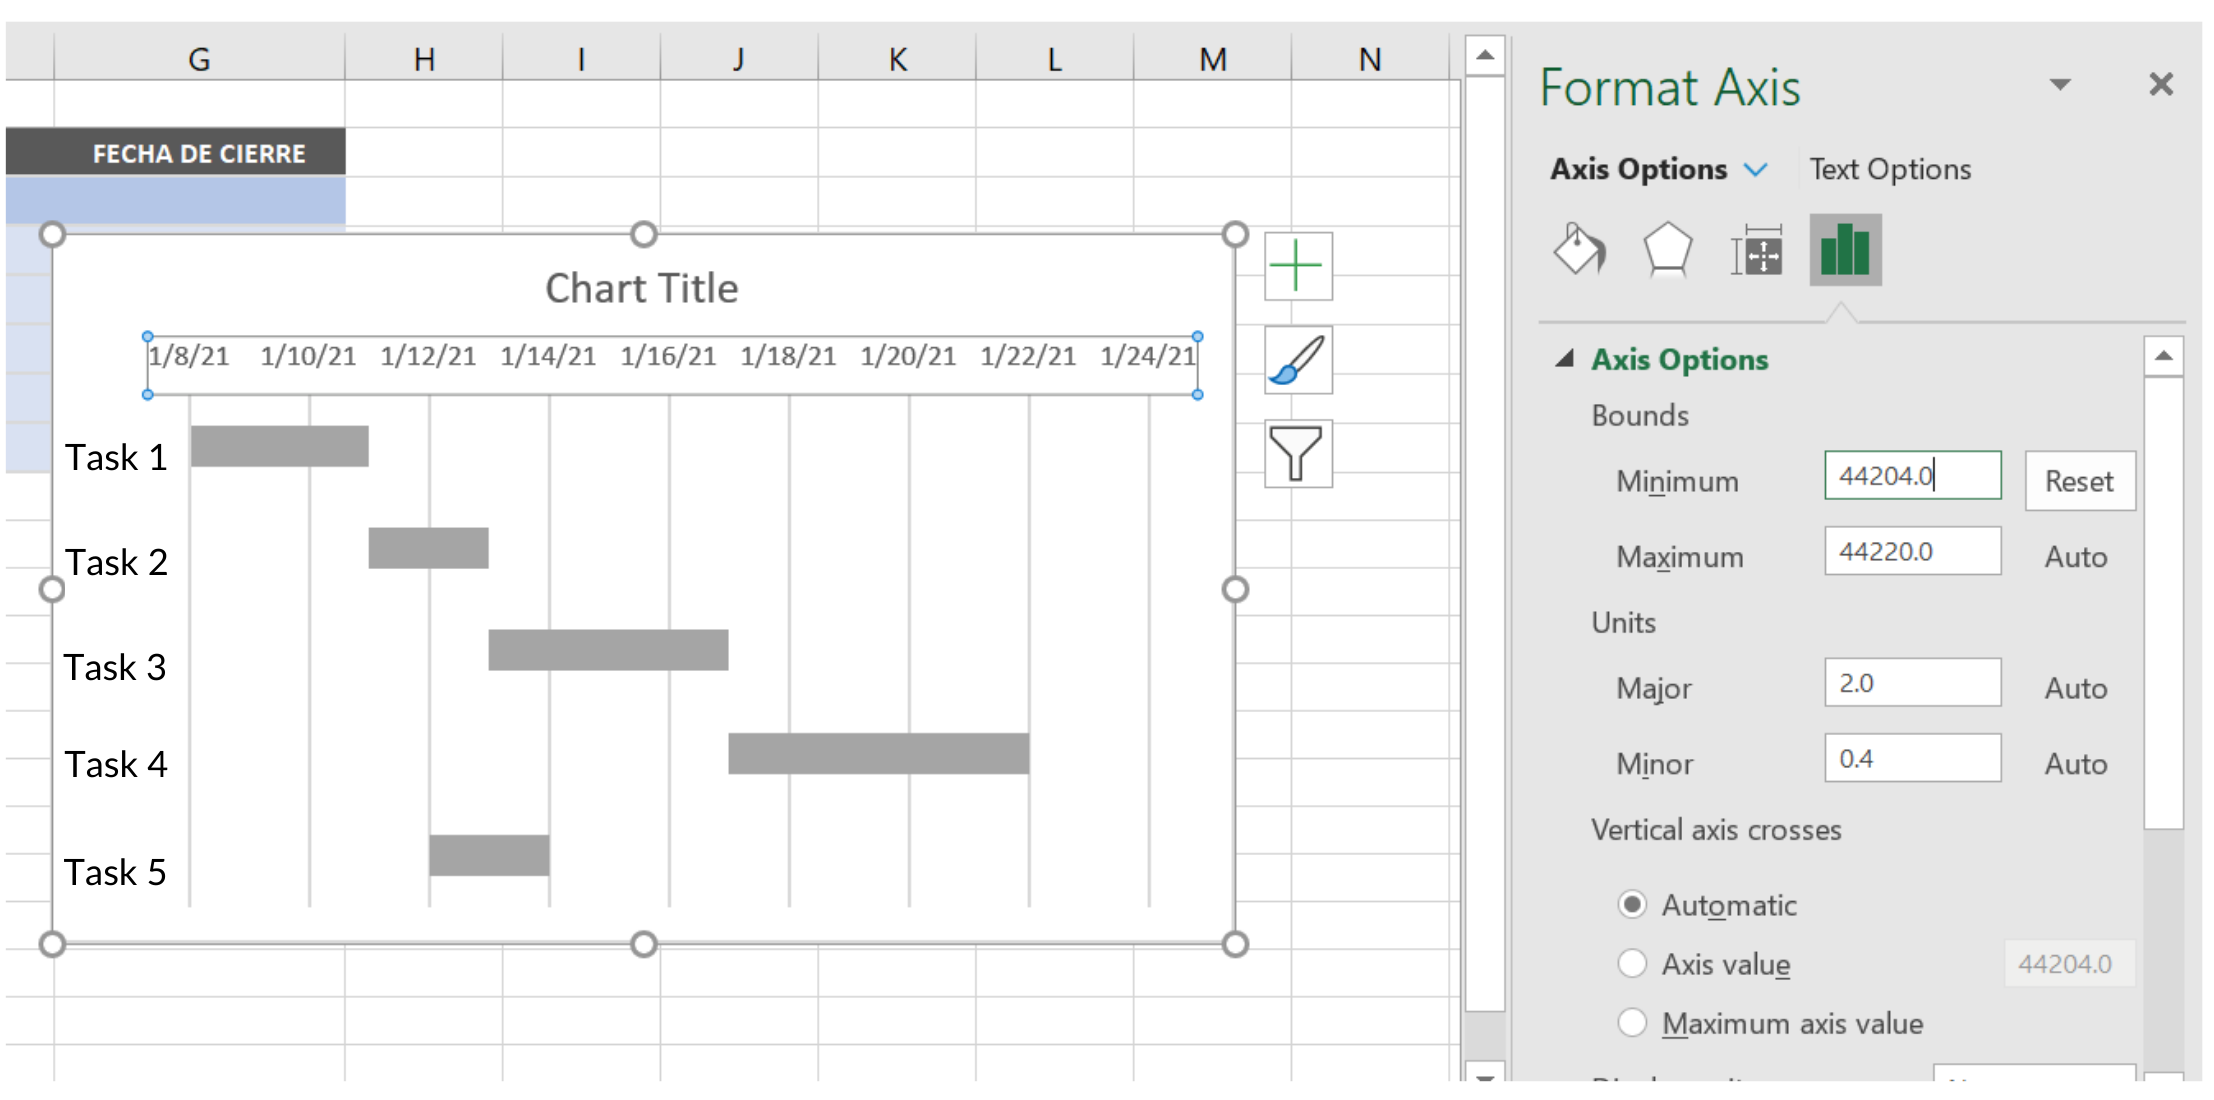
You will see the bars reset to start counting from the project start date. In this way, you have created a Gantt chart or project timeline in Excel.
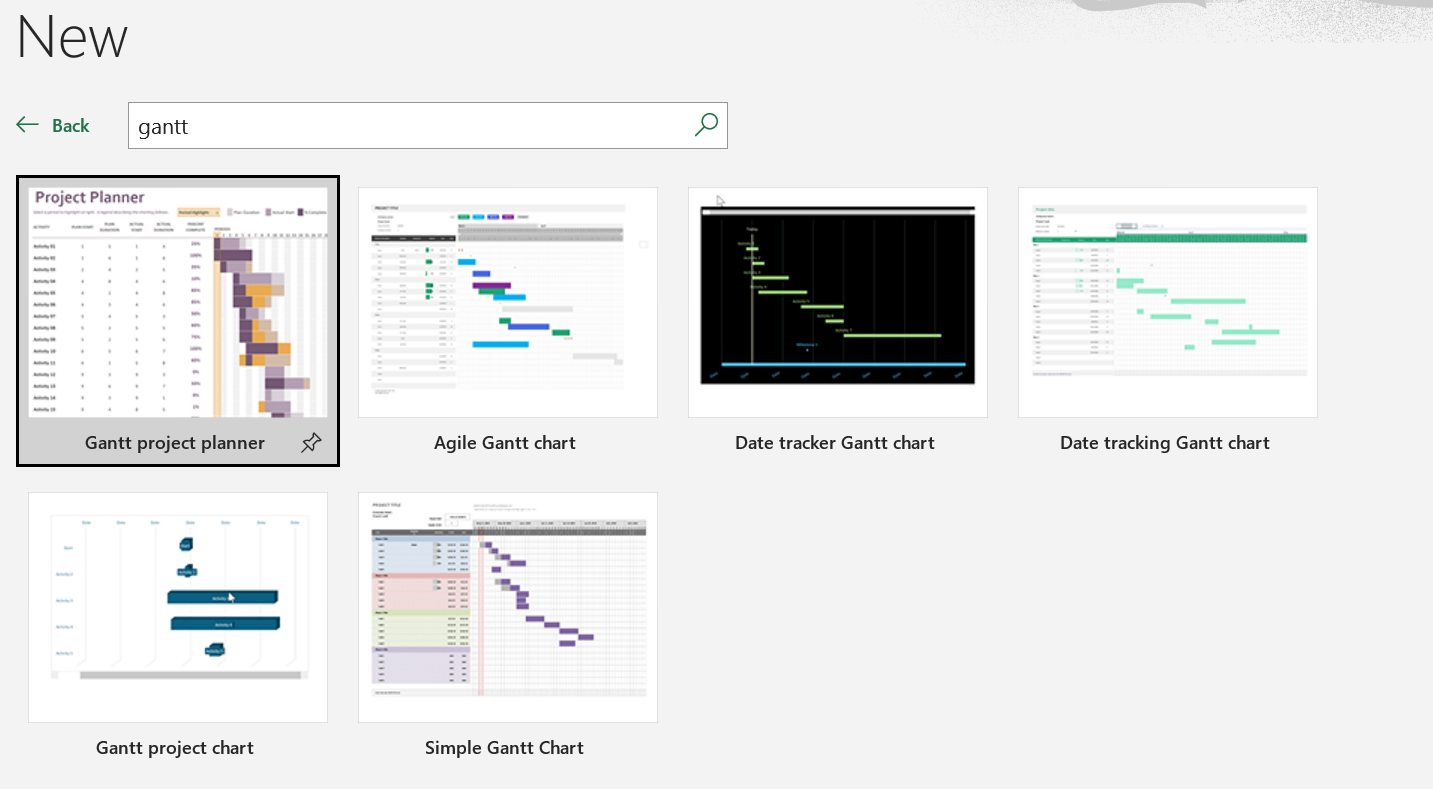
Although Microsoft Excel offers several templates for these types of visual representations, you can customize it as much as you want by doing it yourself.
To access the templates, click on Excel Start, select New, and type Gantt in the template search bar.
Once you have selected the option that best suits your needs, a new sheet will open with the template ready. You will only need to fill in the fields with your project information.
Steps to Make a Timeline in Word
Another option to create your schedule is to do it from Microsoft Word. To do so, we recommend you follow these steps.
Step 1 – Insert a Table
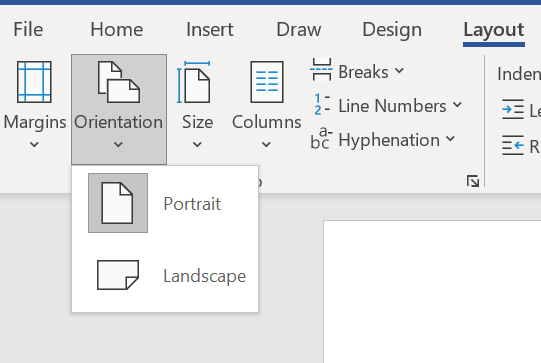
Once you have opened a blank sheet of paper, you must adjust it to display it in horizontal format. To do this, click on the Layout option in the top menu, go to the Orientation button, and select where it says Landscape.
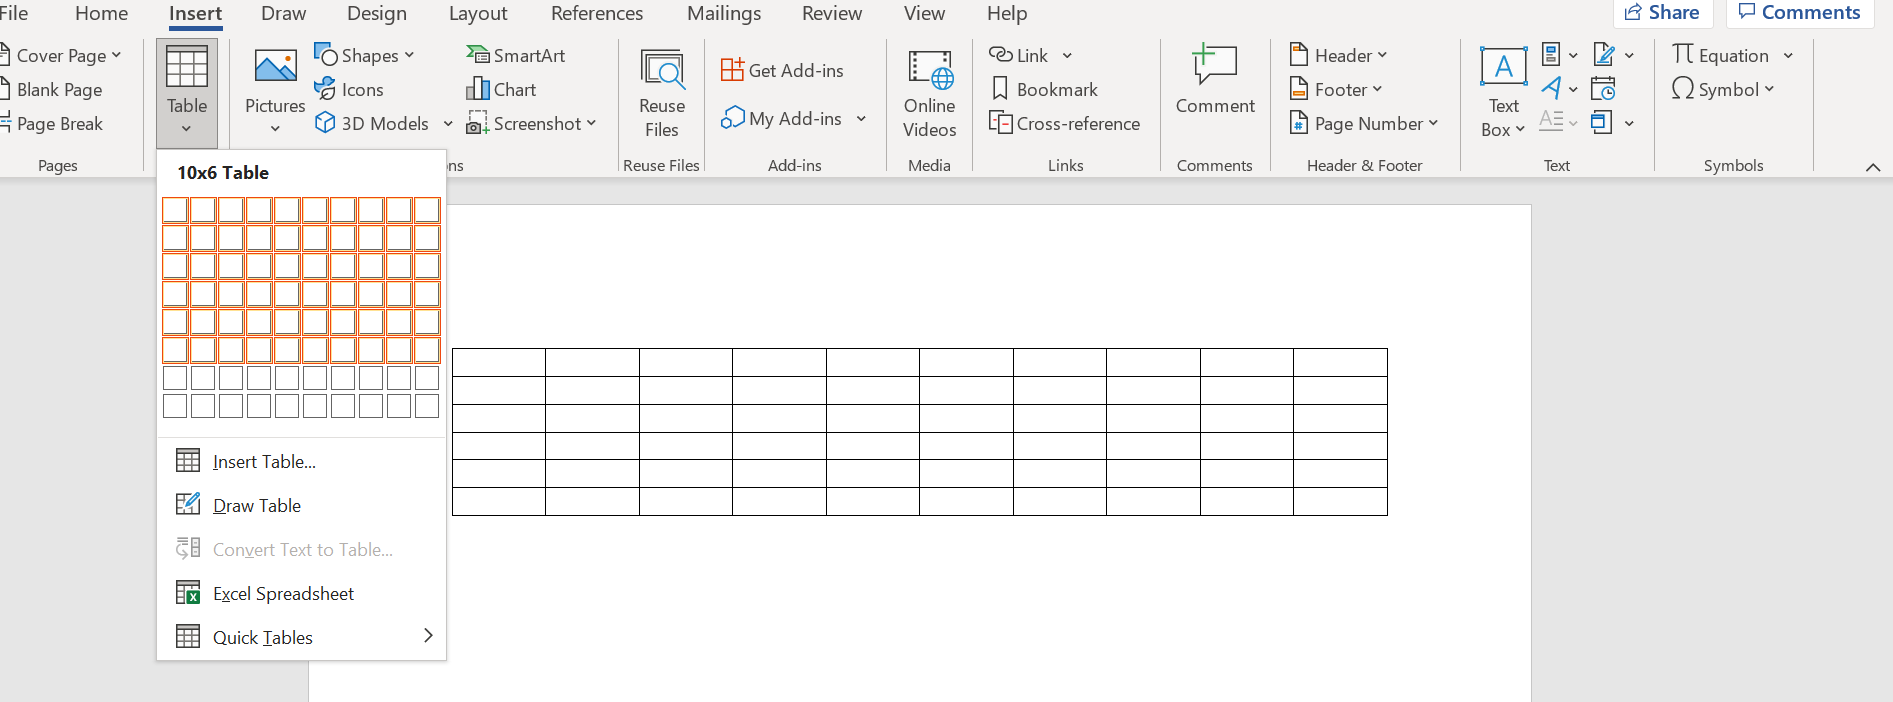
After this step, you will proceed to insert a table.
To do this, you must go to the Insert option in the top menu and click the Table button; the rows and columns will depend on the number of activities and the project duration.
We will create a table with six rows and ten columns as a reference. That is, our project has five activities to be performed and eight months.
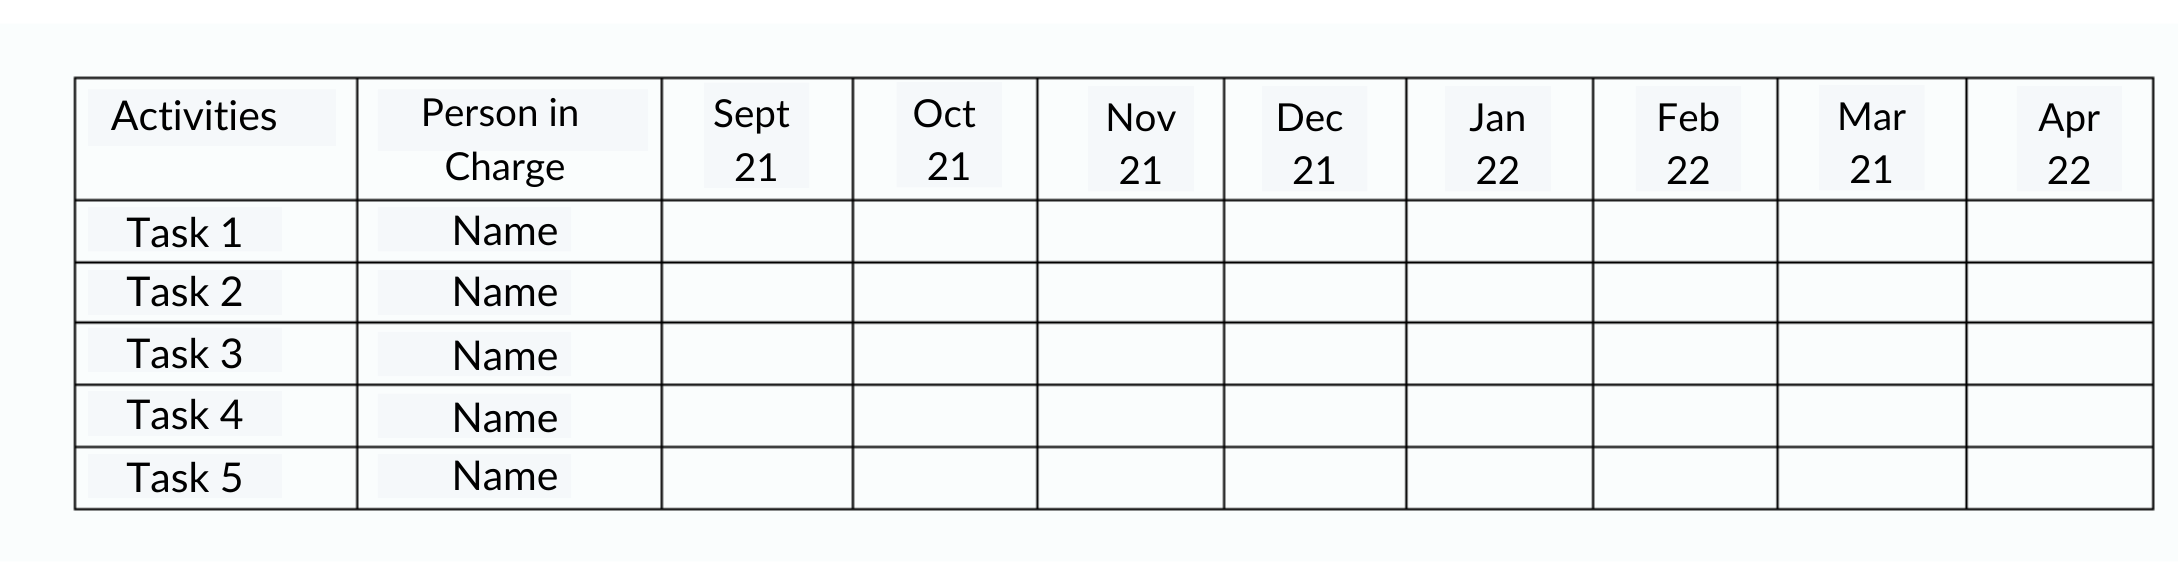
Step 2 – Configure the Table
Now, you must start filling the table with the project data.
As you can see in the image below, the first row will have the periods of the project. Take into account that the first box should have the name “Activities” or “Tasks,” and the second one should have “Responsible” to indicate who the people involved are.
The first column will be used to write the list of tasks to be performed.
Next, you must select a color palette; each tone will represent a different task. The idea is to fill in with the corresponding color for each activity’s period.
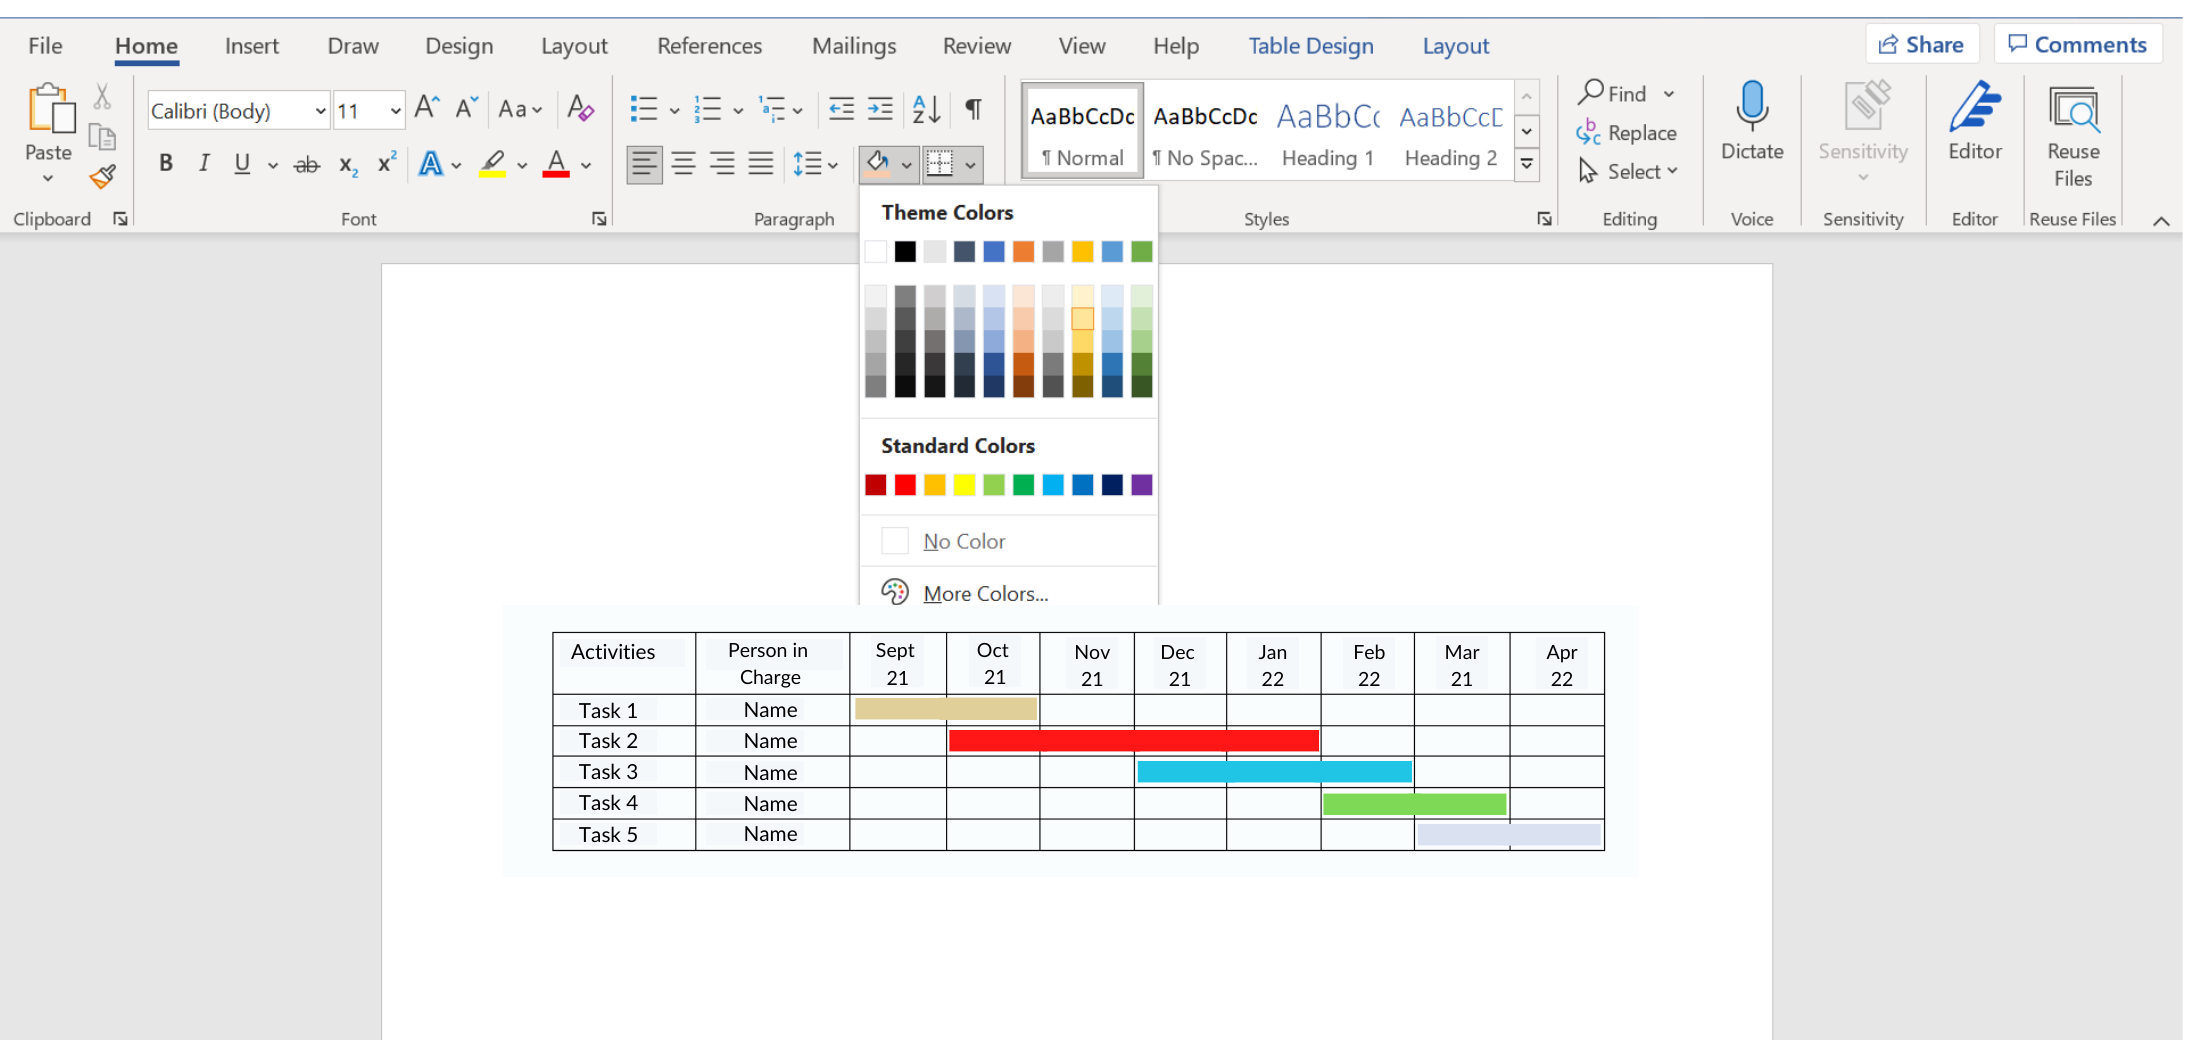
Making a Gantt chart in Word has its disadvantages; it will not allow you to keep track of the development of each of the activities nor the percentage completed, nor does it show the dependency between tasks.
But it is a simple way to get a clear picture of everything that needs to happen, the deadlines to be worked on, and thus, complete the project.
Why Use a Project Management Timeline?
So far, we have explained a project management timeline and how you can create it using two of the most common work tools.
It only remains for us to convince you not to let another project go by without having a dashboard like the one we have shown you.
A timeline is an excellent tool that lets you know in real-time which tasks are delayed and why so that you, as project leader, can intervene in time and provide the necessary support and resources.
On the other hand, it will help you to supervise the project and its stakeholders. Having an updated dashboard lets you see who in the team is working, which tasks are up to date, and which have not yet been started.
Having this information allows you to know in time the delays that are occurring so that you can approach those involved and review the reasons behind it.
As we said before, this dashboard should be available to the entire work team. This way, there are no excuses from people who did not know they were supposed to fulfill some activity.
Finally, we must emphasize that the timeline highlights the relationship between one activity and another. In other words, if task number 2 depends on task number 1, delays cannot be allowed because this means that the other pending tasks cannot be started.
The benefits of having a project management timeline are more than the cost of the time invested in its development.
We understand that these are valuable hours that you must dedicate to create the list of tasks, assign the responsible parties, set the dates, and so on. But having this information in order is worth gold and allows for better oversight and accountability.
If you require additional assistance in creating your project management timeline, don’t hesitate to ask for help from a qualified digital strategy agency.


