


The Complete Photography Guide: Tips, Techniques, and Inspiration
Last update: 1 April 2025 at 11:14 am
 5.00/5
Transitioning from entry-level photography to a more professional level is something that requires you to have the right mindset, the ideal equipment, the technical knowledge, and the discipline needed to enter a highly competitive market. But no need to worry, in this photography guide we will cover everything you need so you can start booking your schedule with photo shoots.
What is Photography?
Let’s start this photography guide with a quick stroll down memory lane. If we trace the history of photography, we find that the first photograph dates back to 1826 or 1827 (authors can’t agree on the exact date). It shows the roof of a building illuminated by the sun. Since then, thanks to technological advances and artistic innovations, photography has evolved in many different ways.

For one, and probably the most notorious, photographs are now in color. Also, there is no need for large and heavy equipment to achieve a beautiful and impressive image. Even better, it can be a one-man job. Today, with a small camera or even your smartphone, you can capture moments in spectacular ways.
If you want to make a living from your passion, you need more than just a camera and a lens. After all, the word photography (from the Greek words “photos” and “graphia”) means light and drawing, respectively. It refers to the art and science of capturing light with a camera to create images. Note that the word science is there, meaning that there are a lot of theories, techniques, and rules to master.
Read on for tips and techniques to help you improve your skills and expand your professional horizons.
Photography Basics: Mastering the Art of Photo Composition
Although photography is an art, it has a set of rules to help you get the perfect shot. While you’re probably familiar with the rule of thirds (where to place the subject of your photo), it’s imperative that you master other important compositional concepts that will help you achieve scientifically and visually pleasing shots.

Most of them agree on one thing: the composition is dictated by the subject and the mood you want to evoke in the viewer. For example, if you want to convey happiness, you can use leading lines that direct the viewer to a subject who is smiling, hugging, or laughing. Subject that you placed using the rule of thirds. Or, if you want to convey loneliness, you can shoot with a panoramic aspect ratio, where a single subject is placed one-third of the way from the edge of the frame.
In other words, the more you know about these composition rules, the easier it will be to understand when to bend or break them without compromising a perfect picture.
Leading Lines
This is a compositional technique in which you intentionally use man-made lines (walls, roads, buildings, railroads, etc.) or natural lines (trees, flowers, clouds, rivers, etc.) to guide the viewer’s eye to the heart of the image. These lines can be:

- Horizontal lines are most often used in landscape photography to give a sense of stability.
- Vertical lines are often used in fashion photography, portraiture, and street photography to draw the viewer’s attention to the top or bottom of the image and to convey strength and confidence.
- Diagonal lines are less commonly used in photography, but can help you emphasize the distance from the foreground to the background.
- Converging lines stop the viewer’s eye to create a sense of tension, conflict or distance.
- Curved lines are also very common in landscape photography because they help the viewer’s eye scroll through the entire photograph.
To use this compositional technique, it’s important to take the time to plan ahead and choose a location that facilitates the process. Work with buildings, train tracks, bodies of water, or anything else that will help draw the viewer’s attention. To make this work, you must place the subject of your photograph where the lines point or converge.
Framing
Another essential photographic composition technique. Framing is used to highlight the main element of your image. You can use background elements (trees, walls, buildings, windows) to frame the edge of the photo and isolate the main subject from the rest.

For example, a very common framing option is to photograph a newlywed couple through a doorway or by pulling back the curtains of a window.
To be successful with this composition technique, we strongly recommend that you look for ways to shoot through natural frames (trees, branches, etc.) to highlight your subject. Always pay attention to the subject; you want to frame it in a way that is not overly bright or distracting.
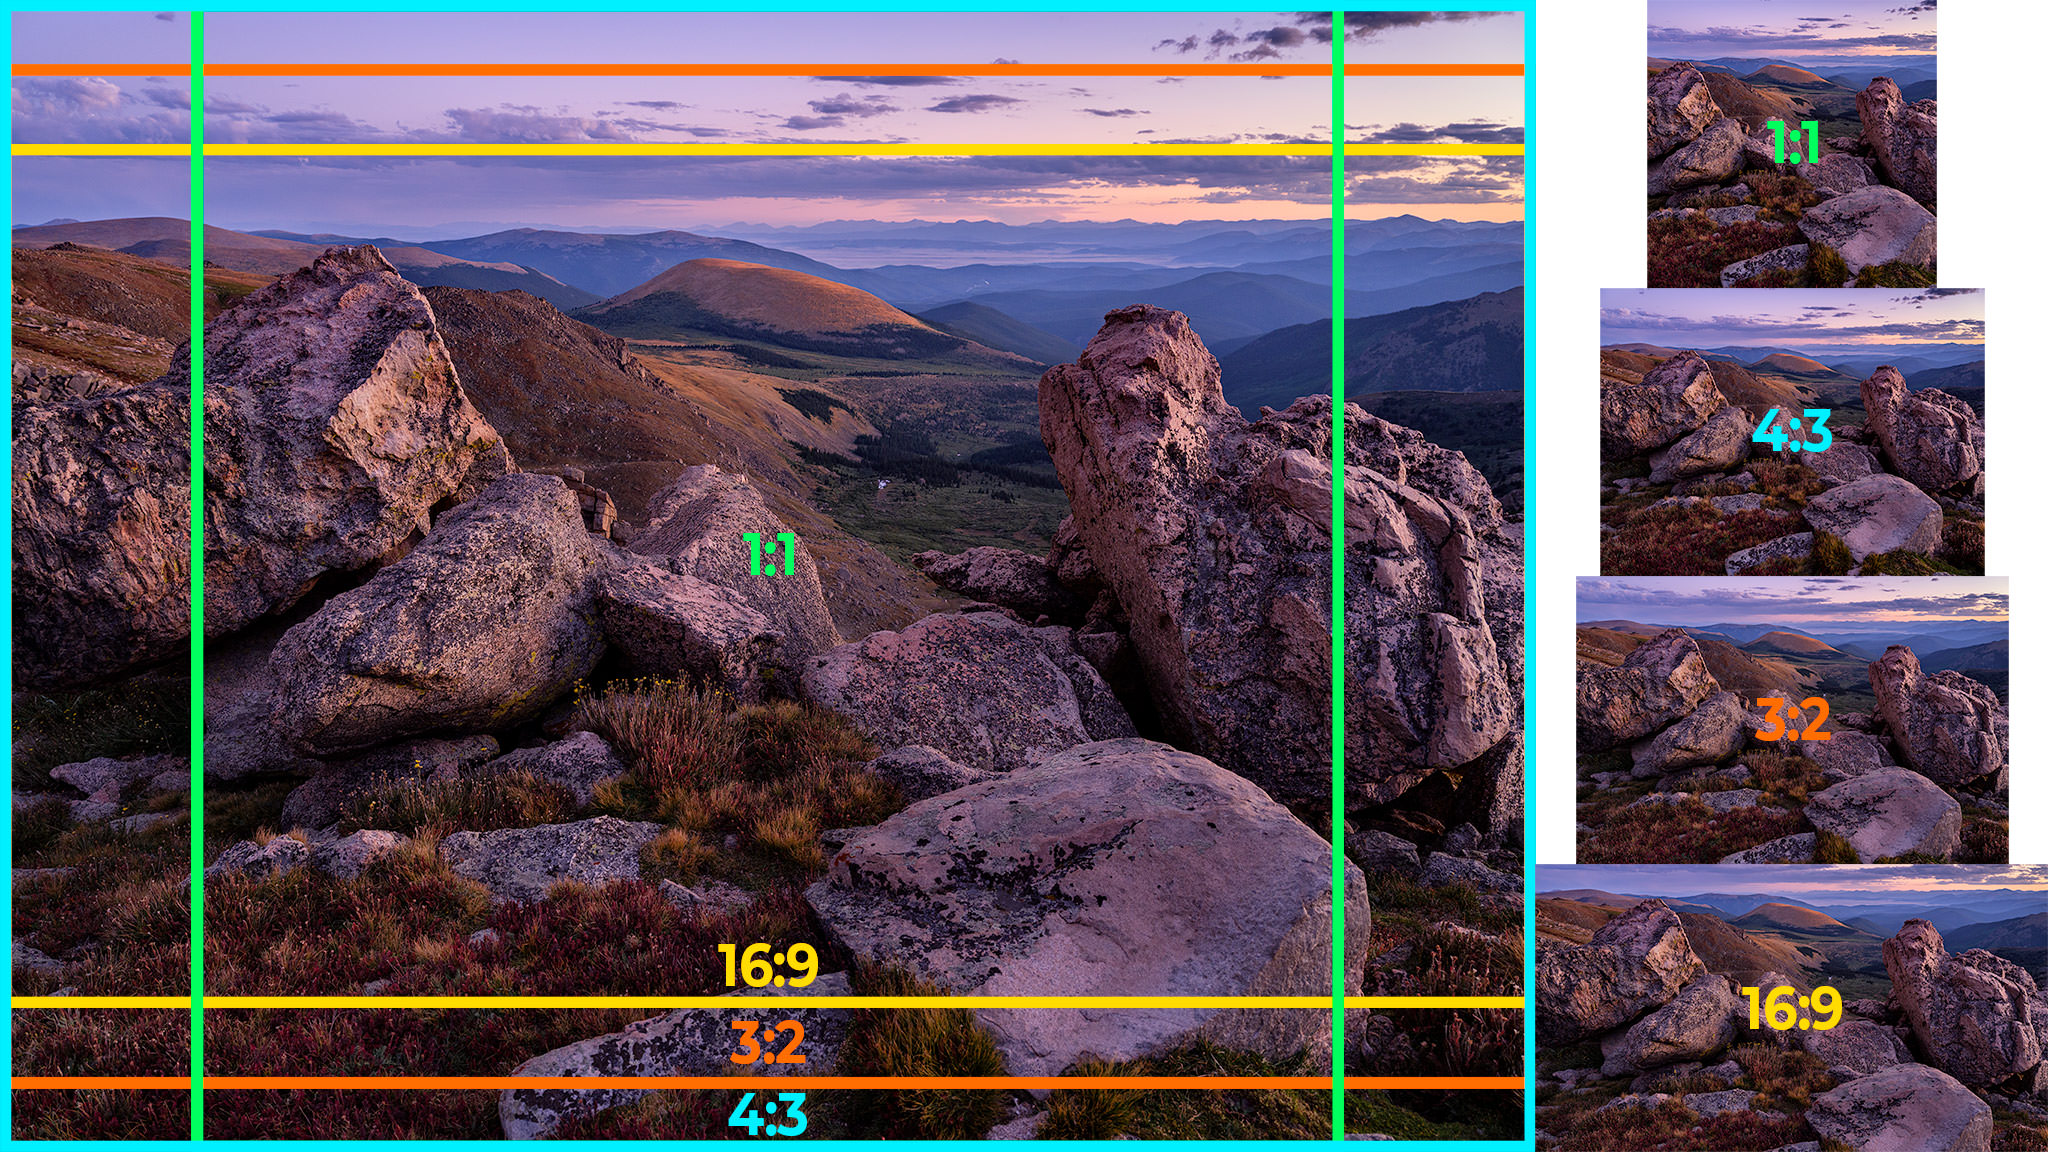
Aspect Ratio
Additionally, to get the perfect shot, you must also consider the aspect ratio. This relationship between the height and width of your image has a profound effect on composition. For example, if you want to capture a landscape, you’ll need to work with a panoramic view. But if you want to shoot a portrait, then a square image would work best.

There are different aspect ratios you can work with, here’s a quick recap of some of the most common ones.
3:2 Aspect Ratio
This is often the default aspect ratio for cameras because it is based on the frames used by 35mm film and gives you a good frame for almost any photo. It can be used for basically any setting and subject.
4:3 Aspect Ratio
With the rise in popularity of micro four-thirds cameras (smaller sensor cameras with interchangeable lenses), this aspect ratio has become very common. It is especially used for photos that will be seen primarily on digital screens and monitors. You can use it to shoot any setting and subject knowing that it will only be enjoyed on a digital screen.
16:9 Aspect Ratio – Panoramic
This aspect ratio features a wide-angle look (the same as TV programs and movies) that is perfect for landscapes, wildlife, or anything else that needs the extra space.
9:16 Aspect Ratio – Vertical Panoramic
This option is useful for photos that need extra height (environmental, landscape, construction site, building, etc.) or photos that will be viewed using a smartphone.
1:1 Aspect Ratio – Squared
While this setting was very common in the days of film photography, it made a comeback when Instagram was launched. Still, it’s mostly used for the social network, not much else. But, it’s worth keeping it in mind when you are planning to shoot portraits, landscapes, close-ups, or wildlife, and you need to eliminate dead space in the background to help the viewer’s eyes focus on the primary element.
Layering
This is another way to compose your photos and add a 3-dimensional illusion. In a nutshell, layering is all about how you arrange multiple objects in your photo to guide the viewer’s attention through the image, from the foreground to the middle ground to the background. This compositional technique is often used in travel and urban photography.

To add this illusion, you must first be able to identify three layers in your photo: foreground, mid-ground (often where the subject is located), and background. Make sure there is enough space between them. You want to have people or elements in each layer, but the subject must be in the middle ground. Viewers should be able to quickly identify it. All the people in the picture should be in harmony with each other to tell a story that the viewer can relate to.
In addition to these rules, you should keep the following concepts in mind when composing your photographs:
- Visual Balance: A compositional technique that arranges elements in a frame to create a sense of balance and harmony. This can be achieved by distributing visual elements so that they have equal visual weight, i.e., they attract the viewer’s eye equally.
- Negative Space: refers to the empty space around the main subject of your photograph. It’s an important part of the overall composition. Depending on your taste and the message and emotions you want to convey, you can use negative space to create a more dramatic effect or to emphasize the subject.
- Perspective: When we talk about perspective in photography, we are talking about the spatial relationship between objects in a photo and how it creates a sense of depth and dimension. In short, it’s the angle from which you photograph your subject.
With these theories and rules in mind, it’s time to get out your Nikon or Canon camera and start experimenting. Find the one you feel most comfortable with and master it. This will help you define your niche and style, and set you apart from other photographers out there.
Essentials of Professional Photography: The Right Equipment
Working as a professional photographer means investing in more than just a camera and a few lenses. In addition to those two things, you need to equip yourself with the right filters, tripods, flash, software, and more. Keep in mind that the specific equipment and accessories will vary depending on the type of photography you do, but here is a list that will give you a general idea of how to start filling out your camera bag.
Photography Camera Guide
There are many brands and models of cameras out there, choosing one over the other is complicated because most of them don’t check all the requirements a professional camera must have. What’s worse, you have to keep in mind that each style of photography has its own set of requirements in terms of camera functionality.
For example, if you specialize in wildlife photography, you need to look for a camera with the best autofocus and phenomenal image quality. Experts agree that the Canon EOS R5 or the Sony A9 III will help you get the job done and capture every single moment of wildlife. But if you want to work with product photography, you need to look for powerful cameras with incredibly high-resolution sensors, such as the Fujifilm X-T5 or the Nikon Z5.
Here is a list of what we think is important to look for in a professional camera. Keep in mind that it’s a general list, and you should always choose the one that checks the most boxes for the type of photography you want to do.
- Complete manual control over camera settings.
- Full frame or advanced APS-C sensor.
- High megapixel count.
- Ability to change lenses based on your photography needs.
- In-body or lens-based stabilization.
- Wide aperture range (low f-numbers).
- Excellent autofocus.
- Dual memory card slots.
- Silent shutter.
- Comfortable grip and well-placed controls.
- Durable body to withstand tough conditions.
Overall, we highly recommend that if you want to upgrade your camera and earn bigger job opportunities, you consider buying either the Nikon Z8, the Canon EOS R5, or the Sony A9 III. If you want to work with a DSLR, you should opt for the Nikon D850.
Photography Lens Guide
Lenses are just as important as the camera itself. Make sure you work with those that offer fast aperture, versatility, and high image quality. But keep in mind that narrowing down the list of available lenses can be overwhelming. To be successful and invest in a lens that you will use, we strongly recommend that you first have a clear understanding of what you will be shooting and the type of photography you will be doing.
- Portrait photography: use anything from 24mm to 200mm, especially the Hasselblad 80mm f2.8 and Hasselblad 100mm f2.2 are preferred by specialists.
- Product photography: look for macro lenses, something like Nikon 105mm f/2.8 or Canon 100mm f/2.8.
- Food photography: Stick with a 100mm macro lens, such as the Canon 100mm f/2.8 Macro, the Hasselblad 80mm f/2.8, or the Hasselblad 100mm f/2.2.
- Landscape photography: Popular focal lengths include 10-24mm, 16-35mm, or 24-70mm.
- Sports photography: popular lenses include the 70-200mm f/2.8, 80-200mm f/2.8 or 100-400mm f/4.5-5.6.
- Fashion photography: Try working with prime 35mm, 50mm and 85mm lenses or zoom lenses such as 24-70mm and 70-200mm. Consider options such as the Nikon Z 6 and Nikkor Z 50 mm lens.
Lighting Guide Photography
While natural light is perfect for getting great shots, the truth is that you can’t always count on it. Some shoots are done indoors, others on a cloudy day or at night. Your kit should be filled with professional lighting equipment, including a full set of flashes, RGB leds, softboxes, reflectors, backdrops, etc. Keep in mind that the specific equipment for each shoot will vary depending on what and where you are shooting.
But here are some recommendations to get you started on investing in great equipment and learning how to use it. In the end, these two things will help you secure great photography jobs and build an impressive portfolio.
- You want to start by investing in a professional flash. Some great options to consider are the Godox V1, Neewer Z2, Westcott FJ80 II, and Profoto A10.
- Check out the different options for continuous light from Godox, these LED lights come with warm/cool tone variations to help you light the scene in a controlled way. This brand also has some great strobe/flash options to help you create powerful, instant bursts of light.
- For softboxes, we recommend taking a look at the NEEWER 33-inch/85cm Parabolic Softbox and the Westcott 48-inch Parabolic Softbox. Both will simplify setup and help you achieve the quality of light you need.
- Check out reflectors like the NEEWER 43 Inch/110 Centimeter Light Reflector Diffuser to bounce light onto your subjects and create unique lighting effects.
- Props and backdrops also come in handy for product, fashion, and portrait photography.
Photography Filters Guide
You also need to invest in a good lens filter kit that attaches directly to your camera. It improves image quality and, most importantly, protect your lenses.
Make sure you choose one that fits your lens brand and size. To help you narrow down the options, we highly recommend taking the time to research options such as:
- Hoya Fusion CIR-PL
- Cokin Z-Pro Expert Kit
- Kase Revolution.
Photography Tripod Guide
As you begin to enter the world of professional photography, you will find that your hand is becoming more and more steady. However, this does not mean that you can go through an entire photo shoot without the help of a tripod.
This support is designed to ensure that your photos are steady and crystal clear. Consider investing in one that will be your companion for long hours of work. Some great options include the Gitzo GT2545T Series 2 Traveler Carbon Fiber Tripod (known for its locking leg system and load capacity), the 3 Legged Thing Winston 2.0 (super sturdy and extremely versatile), and the Vanguard VEO 3+ 303CBS (ideal for heavy cameras and lens equipment).
Photography Software Guide
As if that weren’t enough, you’ll also need to purchase professional photo editing software. tool that will help you put the finishing touches on the perfect photo. Keep in mind that a lot of people tend to only work with Adobe Photoshop, while this is a great option, you need something that allows you to do more in-depth editing, we recommend working with Adobe Lightroom.
This software is packed with all the features you need to organize, edit, and export your photos. While it’s not particularly difficult to learn, we highly recommend that you take the time to master your skills. Watch YouTube tutorials, take an online course, read step-by-step guides, but most importantly, spend hours playing with it and editing photos.
Additional Toys for Your Camera Bag
To wrap up this section, here’s a short list of additional items you should consider adding to your camera bag. Each of these items is designed to help you perfect your photos.
- Dust sensor cleaner
- Camera bag or backpack
- Camera straps
- Color correction cards
- External hard drives
- Extra batteries
- Memory cards
Depending on where you are shooting, you may also want to consider special equipment for rainy, sunny, or snowy days.
How To Become a Professional Photographer
To help you make the transition from beginner to professional photographer, we’ve compiled a list of tips and advice. Read on and try to follow them in order. They are designed to help you understand key concepts, put them into practice, and start getting work.
Complete Guide to Photography
- Begin this journey by creating a list of questions. It will help you identify the niche you want to work with, the style of photography you want to follow, and the types of businesses you want to work with. Identify the skills you need to develop to achieve these professional goals.
- Find a mentor. A great place to meet and find one is through photography lectures, events, exhibitions, and seminars. You can also connect with them through online photographer communities. Try to offer help and work closely with them. This will help you master your skills and learn from their experience.
- Enroll in a photography course that is specific to the type of photography you want to do. This will help you develop your skills, eye, creativity, and technical ability.
- Find an internship with a professional photographer who specializes in the niche and style you want to pursue. Getting hands-on experience is a must, as it helps with technical and social skills.
- Start working on your camera bag and equipment. Follow the recommendations shared earlier and invest in the things that will help you get started with your business.
- Practice every day. Practice makes perfect, and it will give you enough material to start building your own professional photography portfolio.
- Work on your physical and digital portfolio. Make sure you include your best images that show the full range of your work.
- Start marketing your photography business. Places like Sortlist are perfect for showcasing your work and letting businesses know what you can do for them. Make sure you have a clear price list as this will be one of the first things potential clients will ask.
- Joinprofessional organizations and expand your network.
Key Takeaways
- Master the Fundamentals: A strong foundation in photography basics, including composition, lighting, and exposure, is crucial. Understanding these principles will allow you to create visually appealing images.
- Invest in Quality Equipment: A good camera and lenses are essential for professional photography. Additionally, investing in lighting equipment, tripods, and other accessories can significantly enhance your work.
- Develop Your Style: Find your unique photographic voice and style. Experiment with different techniques, subjects, and editing styles to develop a signature look.
- Network and Market Yourself: Building relationships with other photographers, potential clients, and industry professionals is key. Create a strong online presence and actively promote your work.
- Continuous Learning: Photography is an ever-evolving field. Stay up-to-date with the latest trends, techniques, and technology. Attend workshops, take online courses, and practice regularly to hone your skills.
Conclusion
Learning photography is not only personally fulfilling, but also opens the doors to many different career opportunities. If it’s something you’re passionate about, don’t hesitate to invest the time and money to follow your dreams. As you read through the concepts and theories, you will find yourself immersed in a vast world of possibilities to achieve great quality images.
Enroll in courses, watch tutorials, attend workshops, and participate in content. These are all great opportunities to hone your skills, learn from others, and master the art of capturing moments that will last a lifetime.


